Chapter 11 does for Cardiorespiratory Training what Chapter 10 did for resistance training — turns the three phases from Lesson 5 into concrete programming, using the same three-zone intensity model, progressed no faster than about 10% per week.
Lesson 5 introduced Base, Fitness, and Performance Training, along with the three-zone intensity model built on the talk test, RPE, and heart rate at VT1/VT2. This lesson is about actually programming within each phase — and, just as important, progressing a client from one phase into the next without overreaching. Worth fixing firmly in memory: VT1 is the lower-intensity threshold marking the edge of Zone 2, and VT2 is the higher-intensity threshold marking the edge of Zone 3 — reversing the two is an easy way to misread a question.
Programming Within Each Phase
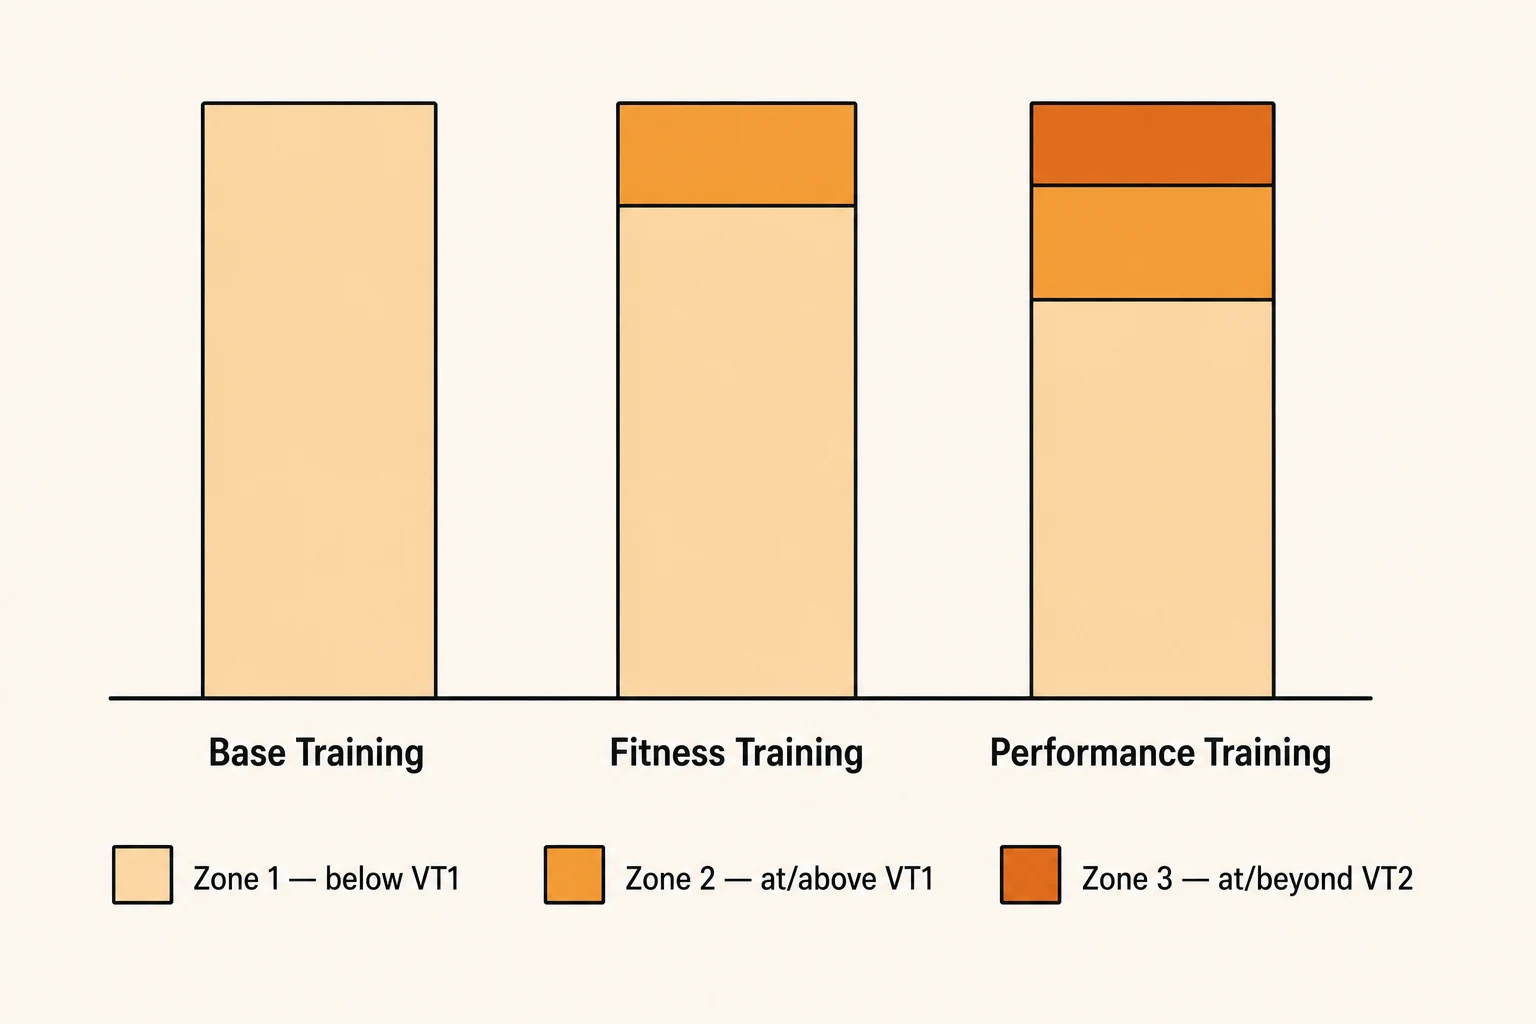
Each phase doesn't replace the one before it — it adds a new layer on top. A client in Fitness Training isn't doing Zone 2 work instead of Zone 1; they're doing Zone 2 intervals in addition to the Zone 1 base they've already built. By the time a client reaches Performance Training, a single week of programming can include all three zones simultaneously, each serving a different purpose.
- Base TrainingAll work stays in Zone 1, below the talk-test threshold. No cardio assessment is needed here — the entire focus is increasing session duration and weekly frequency until the client can sustain 20+ minutes, 3–5 days a week.
- Fitness TrainingZone 1 work continues (warm-up, cool-down, recovery), with Zone 2 intervals introduced at and above the client's VT1 heart rate to build aerobic efficiency.
- Performance TrainingZone 3 intervals at or beyond VT2 get added on top of the Zone 1 and Zone 2 work already established, aimed at improving speed, power, and race- or event-specific performance.
Why Most Training Still Happens in Zone 1
A common misconception is that "more advanced" automatically means "more high-intensity work." In practice, even clients training for endurance performance spend the large majority of their weekly volume in Zone 1 — warm-ups, cool-downs, recovery sessions, and easy steady-state work — with only a small fraction dedicated to genuinely hard Zone 2 and Zone 3 efforts.
The logic is straightforward: a large aerobic base built in Zone 1 is what allows the body to actually absorb and adapt to the harder sessions. Without it, high-intensity work just produces fatigue and injury risk rather than the intended performance benefit.
Progressing Intervals
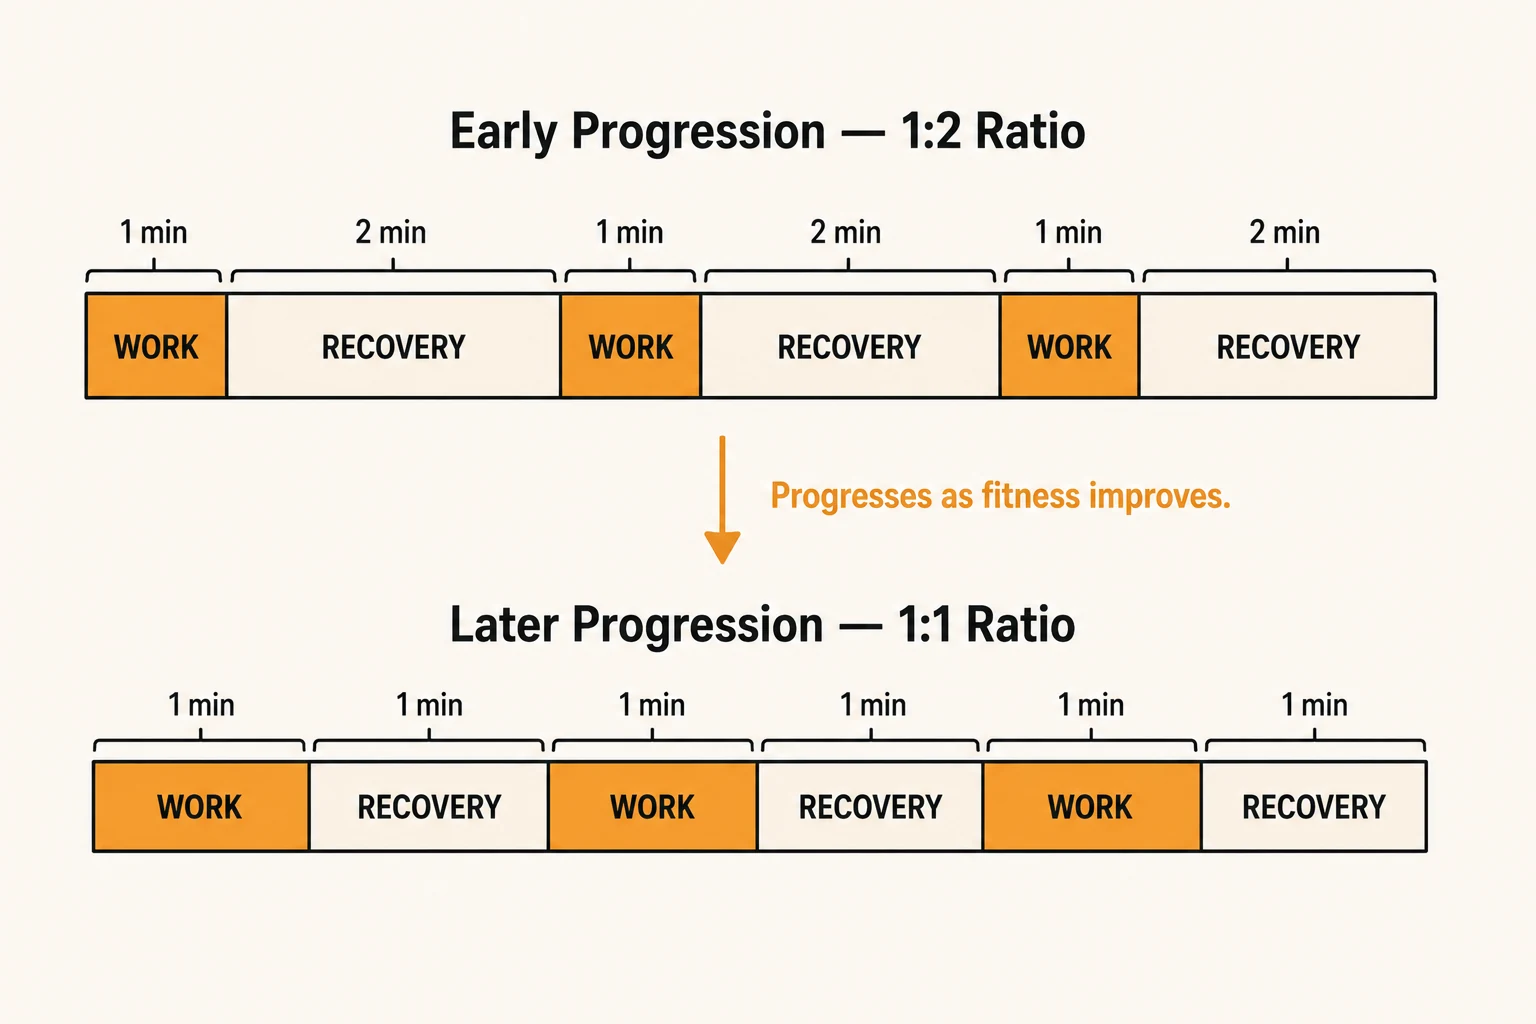
Once a client is ready for interval work, progression typically starts with an easier work-to-recovery ratio — such as performing a hard interval followed by twice as much recovery time (a 1:2 ratio) — and gradually tightens toward a more demanding 1:1 ratio as fitness improves. Interval duration, frequency, and recovery length should all be progressed slowly and deliberately, not increased all at once.
Combining Cardio and Resistance Training in the Same Week
Most clients aren't training cardio in isolation — Chapter 10's resistance programming is happening in the same week, sometimes the same session. When both are scheduled on the same day, the general guidance is to sequence based on the client's primary goal: a client prioritizing strength typically does resistance training first, while fresh, and cardio afterward or on a separate day, since fatigue from a hard cardio session beforehand can compromise lifting performance and technique.
Total weekly load also needs to account for both together, not separately. A client whose resistance program is already progressing aggressively under the double-progressive protocol from Chapter 10 isn't a good candidate for simultaneously pushing the 10% rule to its limit on the cardio side — recovery capacity is shared across both, even though the FITT variables are tracked independently.
The 10% Rule
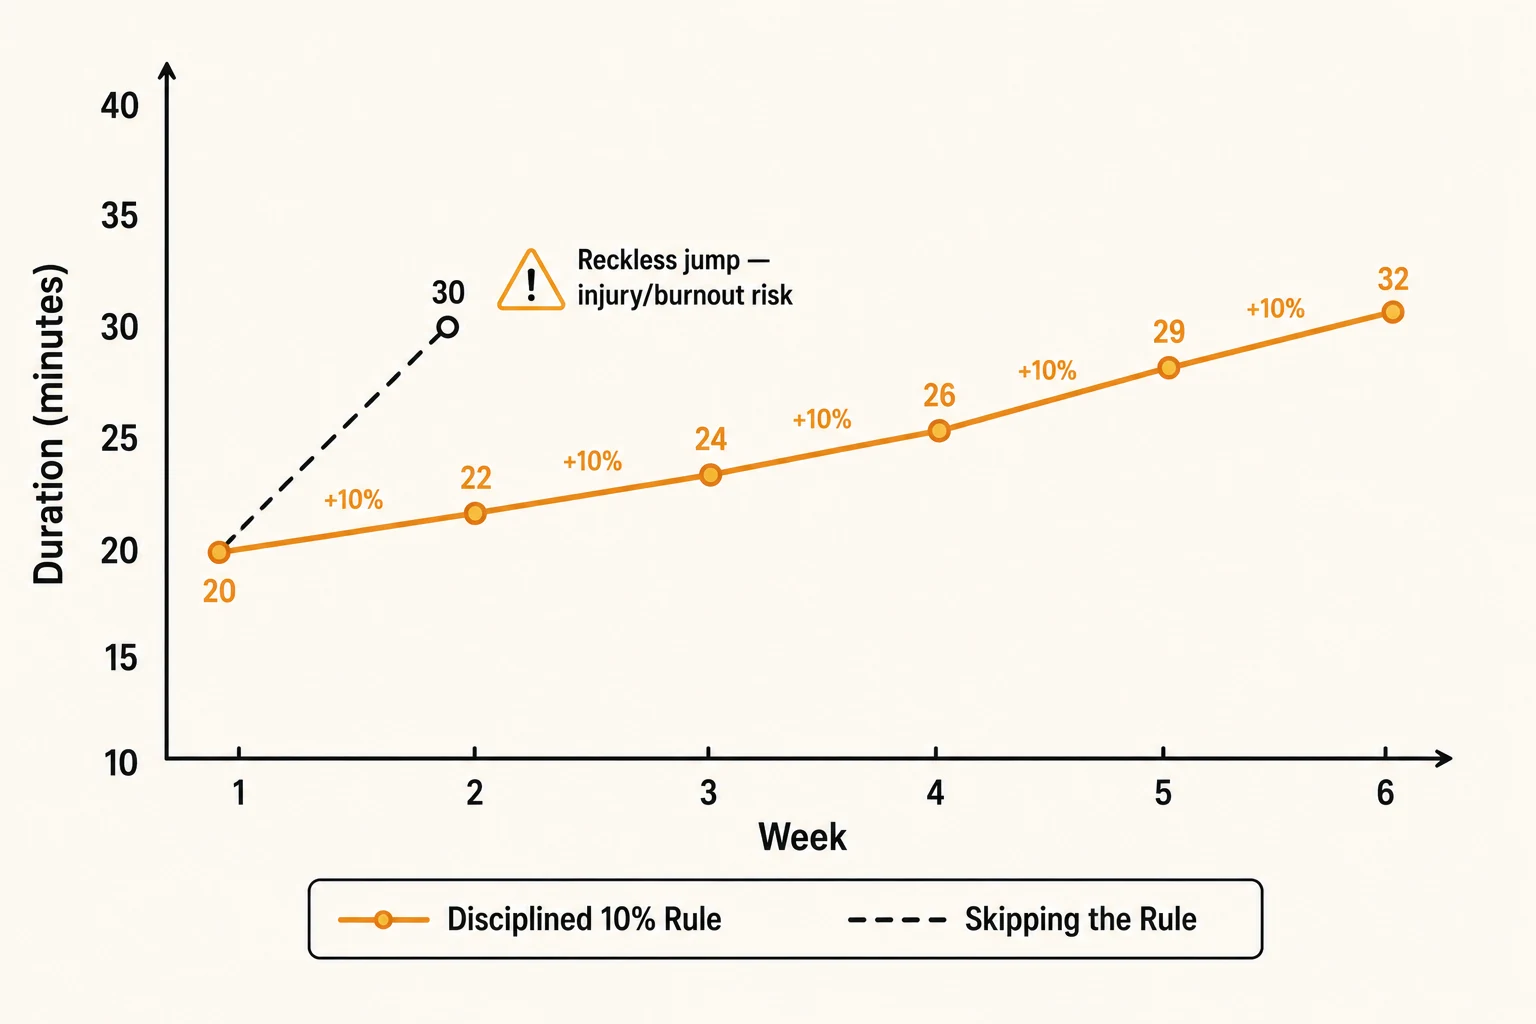
Across every phase, the same guardrail applies: don't increase exercise load — whether that's duration, distance, interval length, or overall session intensity — by more than roughly 10% from one week to the next. This single rule does most of the work in preventing the classic beginner mistake of progressing too quickly and ending up injured, burned out, or simply unable to recover between sessions.
| Week | Duration | Change |
|---|---|---|
| 1 | 20 min | — |
| 2 | 22 min | +10% |
| 3 | 24 min | +10% |
| 4 | 26 min | +10% |
| 5 | 29 min | +10% |
| 6 | 32 min | +10% |
Six weeks of disciplined 10% increases takes this client from 20 to roughly 32 minutes — a meaningful improvement, but a gradual one. A trainer eager for faster results might be tempted to jump straight to 30 minutes in week 2; the 10% rule exists precisely because that kind of jump is where overuse injuries and burnout tend to happen, especially in clients newer to consistent training.
8 questions, modeled on ACE's real exam style. Score 72%+ to mark this lesson complete.
- Base Training stays entirely in Zone 1, building duration and frequency; Fitness Training adds Zone 2 intervals at/above VT1; Performance Training adds Zone 3 intervals at/beyond VT2.
- Even advanced clients spend most of their training volume in Zone 1 — a large aerobic base supports harder sessions rather than replacing them.
- Interval work:recovery ratios typically progress from easier (1:2) toward harder (1:1) as fitness improves.
- The 10% rule limits how fast any exercise variable — duration, distance, interval length, intensity — increases week to week, across all three phases.
- Resistance and cardio training share a client's total recovery capacity — sequence within a session around the priority goal, and don't push both to their progression limits simultaneously.
Before moving to Lesson 12:
- Describe, in one sentence each, what changes in programming as a client moves from Base to Fitness to Performance Training.
- Calculate a 10%-rule progression: a client currently runs 30 minutes. What's the maximum reasonable duration for next week?
- Write one sentence on how you'd sequence a same-day session for a client whose primary goal is strength, not endurance.
- Complete the knowledge check above and review any question you missed.