The 15 Bodyweight Exercises Every Beginner Should Master First
Every major movement pattern. Setup, key form cues, the most common mistake, and the progression — so you build the foundation everything else is built on.
A
Mohan Das
Founder, The Flex Cult
22 May 202614 min read
Beginner-friendly✓ Research-backed
Every fitness journey starts with the same problem: there are too many exercises and no clear answer about which ones actually matter. YouTube has thousands of workouts. Instagram has more. Most of them pile complexity on top of a foundation that has not been built yet.
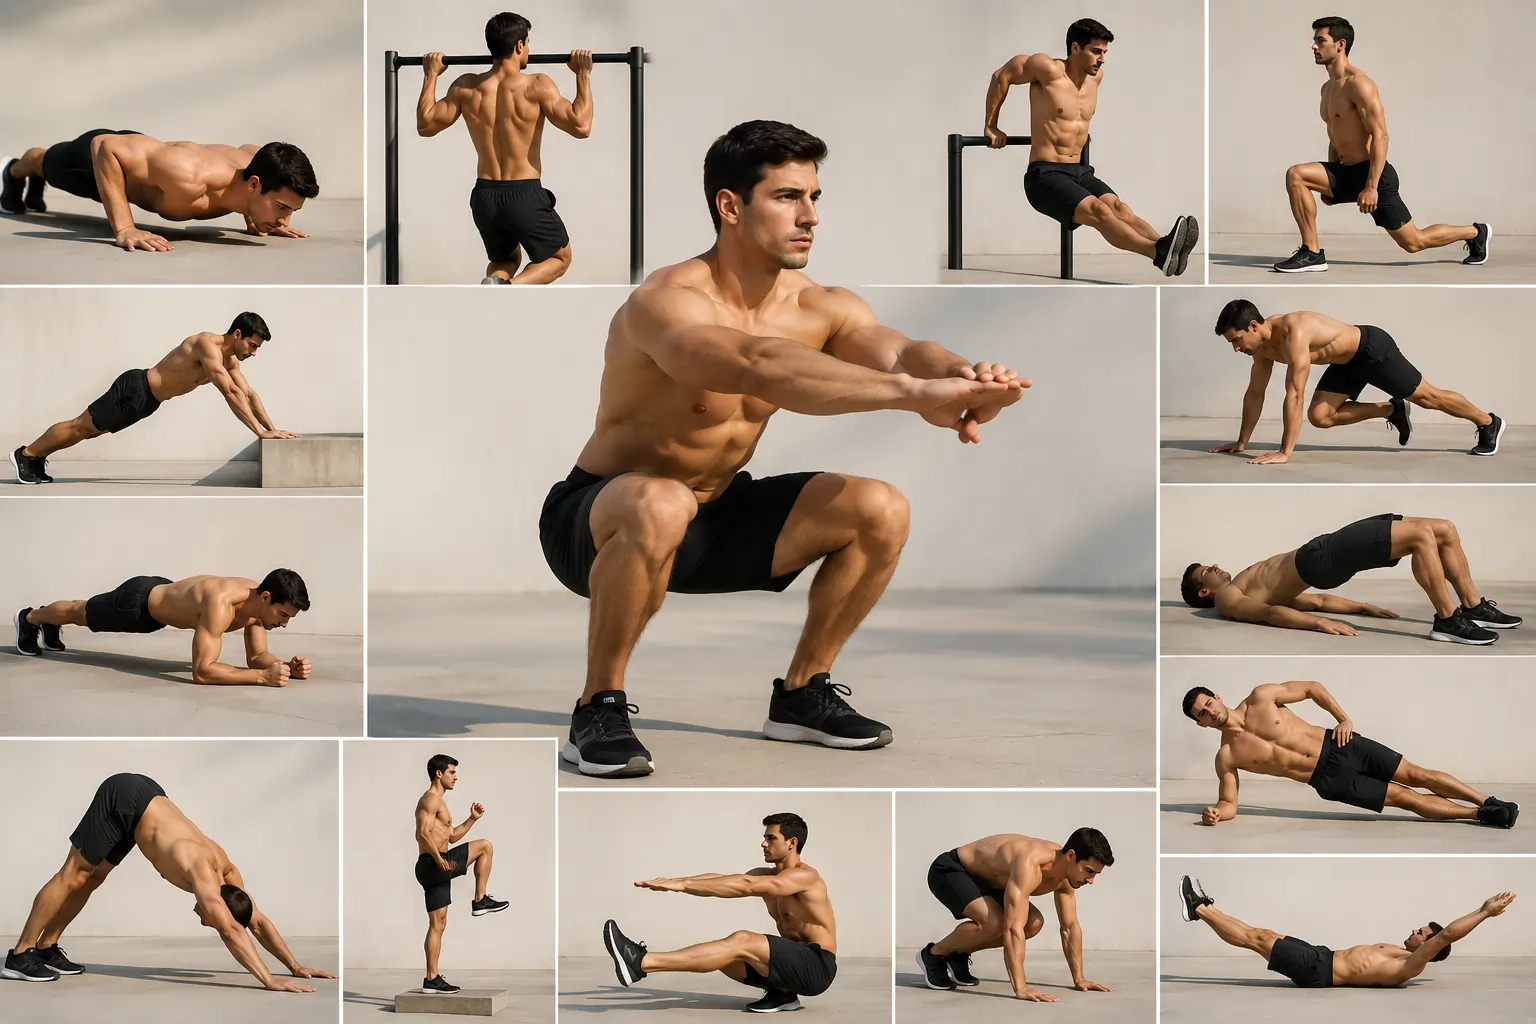
This guide cuts through that. There are fifteen bodyweight exercises that, if you master them properly, give you the foundation for almost everything else in fitness. They cover every major movement pattern. They translate directly to more advanced exercises. They are safe to learn without a coach, provided you understand the form cues.
Mastery here means something specific: you can perform the exercise with correct form, through a full range of motion, without pain, for a meaningful number of reps. Not just going through the motions — actual control. Each exercise description below gives you the setup, the movement, the key form cues, the most common mistake, and the progression once you have it dialled in.
💡 Ready to put these exercises into a structured plan? The 4-Week Home Workout Plan for Beginners uses these exact movements across 12 sessions. Once you've mastered the basics, How to Progress Without Buying Equipment shows you how to keep advancing every exercise using tempo, leverage, and unilateral loading.
The 15 Exercises at a Glance
1
Wall Push-Up
Push (horizontal)
★☆☆☆☆
2
Full Push-Up
Push (horizontal)
★★☆☆☆
3
Pike Push-Up
Push (vertical)
★★★☆☆
4
Towel Row
Pull (horizontal)
★☆☆☆☆
5
Inverted Row
Pull (horizontal)
★★★☆☆
6
Bodyweight Squat
Squat (bilateral)
★☆☆☆☆
7
Bulgarian Split Squat
Squat (unilateral)
★★★☆☆
8
Reverse Lunge
Squat (unilateral)
★★☆☆☆
9
Hip Hinge
Hinge
★☆☆☆☆
10
Glute Bridge
Hinge (supine)
★☆☆☆☆
11
Single-Leg Glute Bridge
Hinge (unilateral)
★★★☆☆
12
Plank
Core (anti-extension)
★★☆☆☆
13
Dead Bug
Core (stability)
★★☆☆☆
14
Side Plank
Core (anti-lateral)
★★★☆☆
15
Burpee
Full body / cardio
★★★☆☆
💡 You do not need to master all fifteen before you start working out. Begin with the exercises in each category rated one or two stars. Add the three-star exercises once the basics feel solid.
Push Exercises
Push exercises train the chest, front shoulders, and triceps — the muscles responsible for moving things away from your body or lowering yourself to the ground. Horizontal push (chest-level) and vertical push (overhead) train overlapping but distinct muscle groups. Both matter for balanced upper body development.
The most common programming error: too much push, not enough pull. For every set of push-ups you do, match it with a set of rows. This keeps the shoulder joint in balance and prevents the rounded-shoulder posture that overloaded push patterns create over time.
1
Wall Push-Up
Horizontal Push · Chest · Shoulders · Triceps
★☆☆☆☆
Why it's here
The wall push-up is not a "baby" exercise. It is the starting point for learning the push-up movement pattern without the compressive joint load of a floor push-up. It builds the body awareness, scapular control, and tricep activation that full push-ups require. If your floor push-up form is poor, the problem is often best fixed by coming back here.
Setup
Stand facing a wall, arms' length away. Palms flat on wall at chest height, slightly wider than shoulder width, fingers pointing upward. Feet together or hip-width, body upright.
Movement
Keeping the body in a straight line from head to heels, bend the elbows and lower your chest toward the wall. Elbows travel at ~45° to the torso. Lower until nose nearly touches the wall, then press back to start.
Key Form Cues
Body stays rigid — no lower back arch or hips pushing back as you lower
Slight shoulder blade squeeze at the bottom before pressing
Breathe in on the way down, breathe out as you press
Common Mistake
Bending at the hips to get closer to the wall. Maintain the straight body line throughout — this is a compensation, not a rep.
Master Standard
3 sets × 15 reps with a 2-second lowering phase and full range of motion
Progression
Incline push-up (hands on step or low table) → Full floor push-up
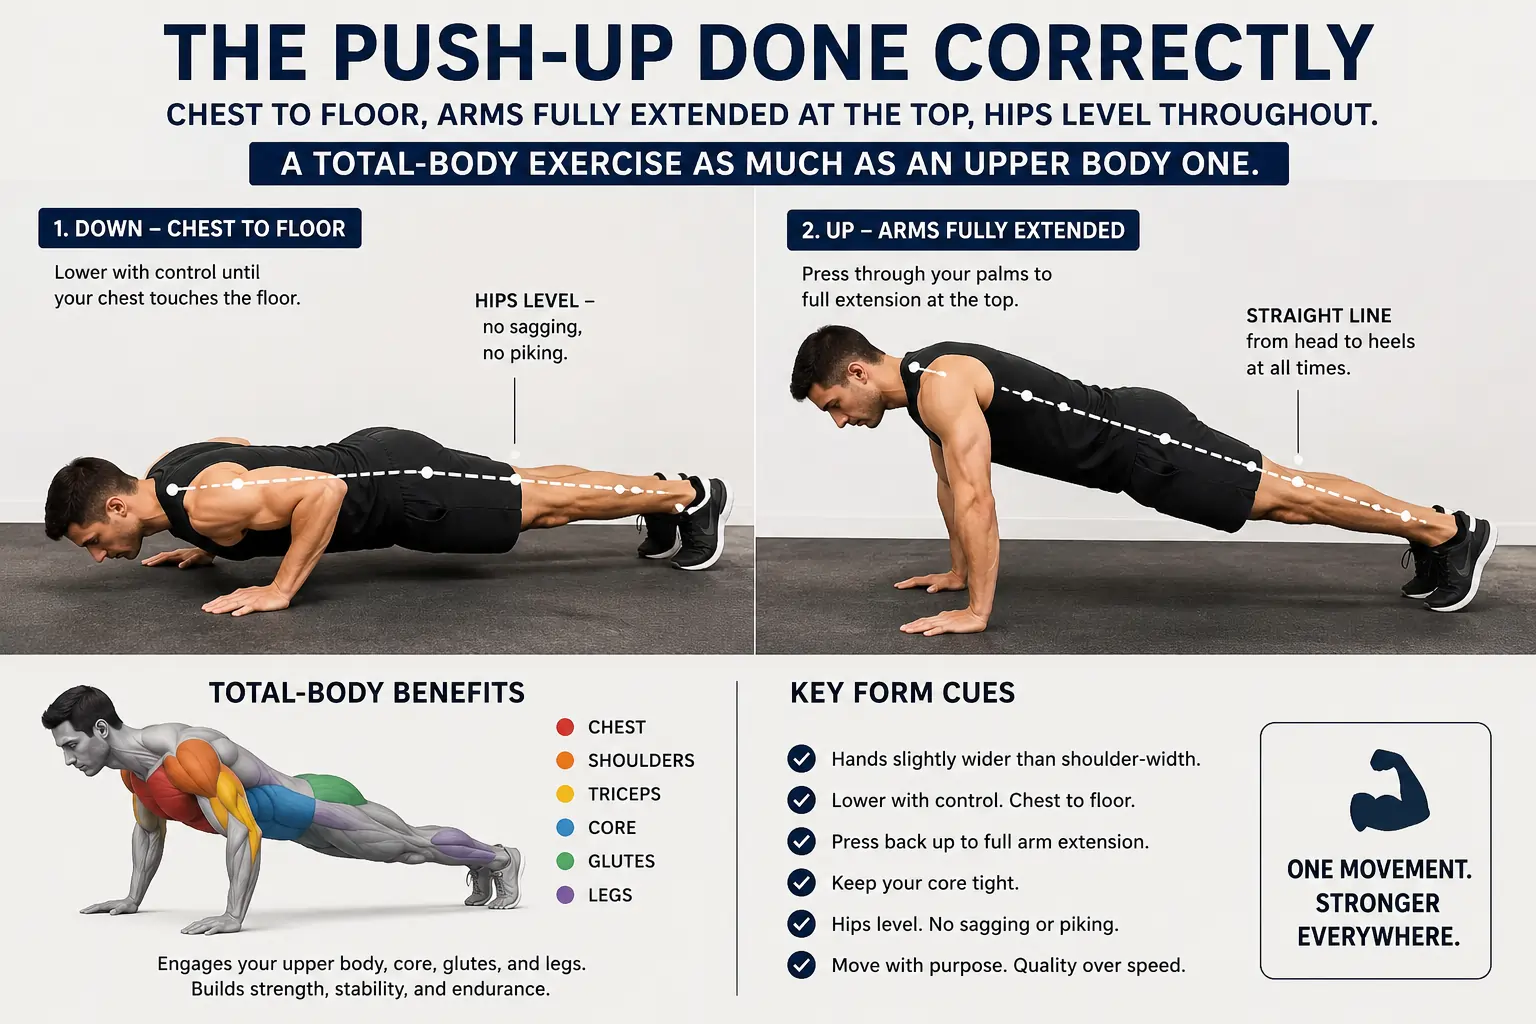
The push-up is one of the most studied exercises in human performance research and one of the few that simultaneously trains the chest, shoulders, triceps, and core as a unit.[1] It is also one of the most commonly performed incorrectly, which is why wall push-ups come first.
Setup
High plank: hands directly below shoulders (or slightly wider), fingers pointing forward, feet together or slightly apart. Body forms a straight line from head to heels. Eyes look ~30cm in front of your hands.
Movement
Keeping the body completely rigid, lower by bending the elbows until the chest barely grazes the floor. Elbows at 45° to the torso. Press back to the start. At the top, actively push the floor away to protract the shoulder blades slightly.
Key Form Cues
Core tight throughout — imagine bracing for a gentle punch to the stomach
Hips must not sag or pike — this is the most common form breakdown
Full range of motion: chest touches the floor, arms fully extend at the top
Elbow angle: 45°. Wider = more chest. Narrower = more triceps.
Common Mistake
Sagging or piked hips — the core is not engaged. Drop to incline push-ups until core strength catches up.
Master Standard
3 sets × 12 reps, full range of motion, zero hip sag or pike
Progression
Slow the lowering phase to 3–4 seconds → Decline push-ups (feet elevated) → Diamond push-ups for more tricep emphasis
3
Pike Push-Up
Vertical Push · Shoulders · Triceps · Upper Back
★★★☆☆
Why it's here
Most beginners completely neglect overhead pushing, which means their shoulder pressing muscles never develop. The pike push-up bridges the gap between standard push-ups and the handstand push-up — training overhead pressing strength and the shoulder stabilisers that protect the joint under overhead load.
Setup
Start in a downward dog position: hands shoulder-width on the floor, hips raised high, body forming an inverted V. Walk feet closer to hands to increase angle and difficulty.
Movement
Keeping hips high, bend the elbows and lower the top of your head toward the floor between your hands. Elbows travel outward (unlike a push-up where they go back — this is an overhead pattern). Press back to the inverted V position.
Key Form Cues
Keep hips as high as possible — dropping them turns this into a regular push-up
Look at the floor between your hands, not forward
Elbows travel outward, not backward — this is what makes it a shoulder exercise
Common Mistake
Hips dropping during the movement — removes the overhead component entirely.
Master Standard
3 sets × 8 reps, full range of motion, hips high throughout
Progression
Elevate feet on a chair or box → Wall-assisted handstand push-up
The push-up done correctly — chest to floor, arms fully extended at the top, hips level throughout. It is a total-body exercise as much as an upper body one.
Pull Exercises
Pull exercises train the upper back, rear shoulders, and biceps — the muscles that pull things toward your body or your body toward things. They are the most underrepresented pattern in most home workout routines, because pulling without equipment requires more creativity than pushing.
Without adequate pull work, the shoulder joint becomes imbalanced: the anterior (front) chain gets stronger while the posterior (back) chain lags. This creates the rounded shoulder posture common in people who do a lot of push-ups and sitting but little back work. A minimum of one pull exercise in every session is not optional — it is injury prevention.
4
Towel Row
Horizontal Pull · Upper Back · Rear Shoulders · Biceps
★☆☆☆☆
Why it's here
The most accessible pulling exercise for a home gym with no equipment. Uses a door, a towel, and your bodyweight to create a genuine horizontal pulling stimulus. The pattern — shoulder blades retracting, elbows driving back — is the same pattern used in barbell rows and cable rows at the gym.
Setup
Open a sturdy door. Loop a thick towel around the handle so you hold one end in each hand. Stand facing the door, feet on either side, knees slightly bent. Lean back until arms are extended, body at ~45° to the floor.
Movement
Keeping the body rigid, pull yourself toward the door by driving your elbows back and squeezing the shoulder blades together. At the top, the handle should be close to your lower chest. Pause briefly, then lower with control.
Key Form Cues
Lead with the elbows, not the hands — think of the hands as hooks and the elbows as the movers
Squeeze the shoulder blades together at the top before lowering
Hips in line with the torso — no sagging or piking
Make it harder by leaning further back (more horizontal body angle)
Common Mistake
Shrugging shoulders upward during the pull. Shoulder blades should move back and down, not up toward the ears.
Master Standard
3 sets × 12 reps, full range, shoulder blade squeeze at top
Progression
Lean further back to increase difficulty → Inverted rows under a table (exercise 5)
5
Inverted Row
Horizontal Pull · Upper Back · Biceps · Rear Shoulders
★★★☆☆
Why it's here
The most effective horizontal pulling exercise available without a gym. Uses your full bodyweight as resistance (modulated by body angle) and builds the upper back strength that transfers directly to pull-ups. Also trains scapular retraction — the movement that counters forward shoulder posture from screen time and overloaded push work.
Setup
Find a sturdy table. Lie underneath it, grip the edge slightly wider than shoulder width, arms extended. Walk feet forward until your body is straight from heels to shoulders, hovering off the floor.
Movement
Keeping body straight and rigid, pull your chest up to the table edge by driving elbows back and wide. At the top, the chest touches or nearly touches the edge. Lower with control, arms fully extended at the bottom.
Key Form Cues
Body must stay rigid throughout — same demand as a horizontal plank
Lead with the chest (sternum), not the chin
Elbows travel back and slightly outward, not straight back
Full extension at the bottom: arms straight, shoulder blades slightly spread
Common Mistake
Bending at the hips to make it easier. Body stays in a straight line from heels to shoulders. Bend the knees to reduce difficulty, not the hips.
Master Standard
3 sets × 10 reps, fully horizontal body, chest reaches the table at top
Progression
Elevate feet to increase difficulty → Add a pause at the top → Slow lowering phase to 4 seconds
Squat Exercises
Squat-pattern exercises train the quadriceps, glutes, and hamstrings through knee-dominant movement. They are the foundation of lower body strength and functional movement — the ability to sit down and stand up is a squat, and its strength translates to everything from running to stair climbing to carrying groceries.
Two bilateral (both legs) and two unilateral (single leg) squat options are included here. Unilateral training is underused by beginners but critically important: it corrects side-to-side imbalances, builds single-leg stability, and provides a much higher training stimulus per leg than bilateral training.
Teaches the fundamental squat pattern — hip flexion, knee flexion, and ankle dorsiflexion occurring simultaneously — before any external load is added. Poor squat mechanics are the source of most knee and lower back issues in strength training. Getting this movement right first protects everything that comes after.
Setup
Feet approximately hip-width apart, toes pointing forward or slightly out (up to 30°). Arms forward for balance. Eyes straight ahead.
Movement
Initiate by pushing hips back slightly, then bending the knees. Descend until thighs are parallel (or as low as mobility allows). Chest tall, spine neutral. Drive through heels to stand, squeeze glutes at top.
Key Form Cues
Knees track over toes — do not let them cave inward (valgus collapse)
Chest stays tall — if it falls forward, the posterior chain is too tight
Weight in the midfoot and heels, not the toes
Full depth: thighs parallel to the floor minimum, once mobility allows
Common Mistake
Knees caving inward on descent or ascent — usually a glute activation issue. Consciously push knees outward over toes throughout.
Master Standard
3 sets × 15 reps, thighs parallel or below, knees track toes, no forward lean
Progression
2–3 second pause at the bottom → Slow descent to 4 seconds → Bulgarian split squat or jump squat
7
Bulgarian Split Squat
Unilateral Squat · Quadriceps · Glutes · Hip Flexors
★★★☆☆
Why it's here
The single most demanding bodyweight lower body exercise available without equipment. Builds quad and glute strength unilaterally, exposes and corrects side-to-side imbalances, and develops the hip flexor flexibility that desk-bound lifestyles destroy. It is also a prerequisite movement for the pistol squat.
Setup
Stand ~60–70cm in front of a chair or couch. Place the top of your rear foot on the seat behind you. Front foot is far enough forward that on descent, the front shin stays roughly vertical. Hands on hips or clasped at chest.
Movement
Lower by bending the front knee, dropping the rear knee toward the floor. Descend until the rear knee nearly touches the floor and the front thigh is roughly parallel. Torso upright. Press through the heel of the front foot to return.
Key Form Cues
Front shin stays as vertical as possible — if the knee shoots far forward, step the front foot out more
Torso stays upright — do not lean forward into the movement
The working leg is the front leg — the rear foot is just for balance
Feel the stretch in the rear hip flexor at the bottom
Common Mistake
Front knee caving inward or excessive forward lean — both indicate glutes not firing. Slow the descent and consciously push the front knee outward.
Master Standard
3 sets × 8 reps each leg, rear knee nearly touching floor, torso upright throughout
Progression
2-second pause at the bottom → Hold a water bottle in each hand for added load → Pistol squat work
The more beginner-friendly unilateral leg exercise — stepping backward is more stable and places less shear force on the knee than forward lunges. It trains the same muscles but with better knee mechanics, and develops the balance and coordination that single-leg movements build progressively.
Setup
Stand feet hip-width apart. Hands on hips or out to the sides for balance. Eyes straight ahead.
Movement
Step one foot directly backward, landing on the ball of the rear foot. Lower the rear knee toward the floor until it nearly touches. Front shin remains vertical, front thigh approaching parallel. Press through the front heel back to standing. Alternate legs.
Key Form Cues
Front shin vertical — if the knee shoots past the toes, take a slightly longer step back
Torso upright throughout — resist the temptation to lean forward
Both feet pointing forward, not turned out
Control the descent: do not let the rear knee crash to the floor
Common Mistake
Front knee tracking inward on descent or return. Push it outward over the 2nd and 3rd toes throughout.
Master Standard
3 sets × 10 reps each leg, full depth, front shin vertical, controlled descent
Progression
1–2 second pause at bottom → Walking lunges → Bulgarian split squat
Hinge Exercises
Hinge exercises train the posterior chain — glutes, hamstrings, and lower back — through hip-dominant movement where the hinge occurs at the hip joint rather than the knee. They are the most underperformed movement pattern in beginner training and the most important one for lower back health and long-term structural balance.
Most beginners squat when they should hinge, which overloads the lower back and underloads the glutes and hamstrings. Learning to feel the difference between a squat (knees bend, hips descend) and a hinge (hips push back, spine stays long) is one of the most valuable movement skills in fitness.
9
Hip Hinge
Hip Hinge · Hamstrings · Glutes · Lower Back
★☆☆☆☆
Why it's here
The hip hinge is a movement pattern, not just an exercise. It is the foundation of every deadlift, Romanian deadlift, and kettlebell swing variation. Learning to load the posterior chain by pushing the hips back while maintaining a long, neutral spine is a prerequisite movement skill for injury prevention in daily life and training.
Setup
Stand feet hip-width apart. Stand ~20cm from a wall behind you (a useful biofeedback tool). Soft bend in the knees throughout — this is not a squat; the knees do not flex significantly.
Movement
Push the hips back toward the wall behind you while keeping the spine long and neutral. As hips travel back, the chest naturally lowers. Push far enough to feel a hamstring stretch. Drive the hips forward to return to standing, squeezing the glutes at the top.
Key Form Cues
The movement comes from the hip, not the spine — do not round the back
Maintain a long spine: imagine a rod from tailbone to crown
Hamstrings should feel a stretch at the bottom, not the lower back
Weight stays in the midfoot throughout
Common Mistake
Squatting instead of hinging — knees flex significantly rather than hips pushing back. Keep shin angle consistent; most of the movement comes from the hips traveling back.
Single-leg hip hinge (balance on one leg) → Add a loaded hinge once the pattern is solid (water bottles, backpack)
10
Glute Bridge
Hinge (Supine) · Glutes · Hamstrings · Core
★☆☆☆☆
Why it's here
The best entry-level exercise for glute activation — the ability to consciously contract the glutes, which most sedentary people lose from hours of sitting. Weak, underactivated glutes are implicated in lower back pain, knee pain, and poor athletic performance. This exercise corrects the pattern at the root.
Setup
Lie on your back, knees bent, feet flat on the floor hip-width apart, heels approximately 30cm from your glutes. Arms at sides, palms down.
Movement
Press the heels into the floor and squeeze the glutes to lift hips until body forms a straight line from shoulders to knees. Hold the top for 1–2 seconds, squeezing the glutes hard. Lower with control.
Key Form Cues
Drive through the heels, not the toes — calves cramping means the heels need to do more work
Squeeze glutes hard at the top — if feeling it primarily in the hamstrings, push knees slightly outward
Hips stay level — both sides of the pelvis rise evenly
Neutral spine at top: no excessive lower back arch
Common Mistake
Rising onto toes rather than driving through heels — shifts load to calves instead of glutes.
Master Standard
3 sets × 15 reps, 2-second hold at top, clear glute contraction throughout
Progression
Slow the lowering phase → Elevate feet on a surface → Single-leg glute bridge (exercise 11)
11
Single-Leg Glute Bridge
Hinge (Unilateral) · Glutes · Hamstrings · Core Stabilisers
★★★☆☆
Why it's here
One of the most important exercises for exposing and correcting left-to-right glute strength imbalances. Also builds the hip stability required for running, jumping, and stair climbing. Most people discover a significant strength difference between sides — this exercise addresses it directly.
Setup
Lie on back as for the standard glute bridge. Lift one foot off the floor, extending that leg straight. The working leg has foot flat on the floor, knee bent.
Movement
Press through the heel of the working leg to drive hips up until body forms a straight line from shoulder to working knee. Non-working leg stays extended. Hold 1–2 seconds at top, squeezing the glute of the working leg, then lower with control.
Key Form Cues
Hips stay level at the top — do not allow the non-working side to drop
Drive through the heel of the working leg, not the toes
Extended leg roughly parallel to the thigh of the working leg at the top
Core engaged throughout to prevent lower back from taking over
Common Mistake
Non-working hip dropping at the top — glute of the working leg is not reaching full extension. Start with the non-working foot resting lightly on the floor for balance, then progress to full.
Master Standard
3 sets × 12 reps each leg, level hips, clear glute contraction throughout
Progression
3-second hold at the top → Elevate working foot on a surface → Resistance band above the knees
Unilateral training — one leg at a time — exposes the side-to-side strength differences that bilateral squats mask. Most people find they are significantly stronger on one side. This is normal. Single-leg work corrects it.
Core Exercises
Core training at the beginner level is widely misunderstood. Most people think of core work as ab exercises — sit-ups, crunches, leg raises. These train spinal flexion. The core's primary function, however, is stabilisation: resisting unwanted movement of the spine while the limbs move.
The three core exercises here each train a different stabilisation function: anti-extension (resisting the spine extending), dynamic stability (resisting spine flexion and rotation under limb load), and anti-lateral flexion (resisting the spine bending sideways). Together they produce comprehensive core strength that protects the lower back, transfers force between upper and lower body, and supports every other exercise in this guide.
The foundational anti-extension core exercise and the baseline for almost all advanced core work. Its primary demand is to resist the pull of gravity collapsing the spine into extension — the same demand present in push-ups, rows, and virtually every exercise where the spine must remain stable under load.
Setup
Forearms on the floor, elbows directly below shoulders. Forearms parallel or hands clasped. Toes on the floor. Body in a straight line from heels to the back of the head.
Movement
Maintain the straight line. Do not let the hips sag toward the floor (most common) or pike toward the ceiling (second most common). Breathe normally — the ability to breathe during a plank is a sign you are not over-bracing.
Key Form Cues
Squeeze the glutes — often the difference between hip sag and a level plank
Pull the elbows toward the toes (without moving them) — activates the lats, increases core tension
Neutral neck: look at the floor, not forward
If form breaks before the time target, stop and rest — do not hold with compromised form
Common Mistake
Hips sagging, lower back arching — puts the load on the lower back, not the core. Drop to a knee plank until core strength improves.
Master Standard
3 holds × 45–60 seconds, level hips, neutral spine throughout
Progression
Plank shoulder taps → Plank hip dips → RKC plank (arms extended forward, maximum tension throughout)
13
Dead Bug
Core — Dynamic Stability · Deep Core · Hip Flexors · Lower Back
★★☆☆☆
Why it's here
Arguably the most important core exercise a beginner can learn, yet it appears in almost no beginner programmes. It trains the deep core stabilisers — transversus abdominis, multifidus — that protect the lumbar spine during limb movement. This is the pattern active in running, throwing, squatting, and every functional movement where the core must stabilise while the limbs move independently.
Setup
Lie on your back, arms extended toward the ceiling, knees bent at 90° and raised so thighs are vertical. Lower back pressed firmly into the floor — the key position to maintain throughout.
Movement
Simultaneously extend the right arm overhead and extend the left leg toward the floor. Both limbs travel slowly, hovering just above the floor at end of range. Return to start, then repeat with opposite arm and leg. Lower back stays pressed to the floor throughout.
Key Form Cues
Lower back stays pressed into the floor — the moment it lifts, the movement has exceeded your current core capacity
Move slowly with full control — 3–4 seconds per repetition
Breathe out as the limbs extend, breathe in as they return
Arm and leg reach simultaneously — not one after the other
Common Mistake
Lower back lifting off the floor as the limbs extend. Reduce the range of motion (do not extend limbs as far) until core strength catches up.
Master Standard
3 sets × 8 reps each side, lower back on floor throughout, full limb extension
Progression
2-second hold at full extension → Add resistance band tension for added anti-extension demand
Trains the lateral stability of the spine — the obliques and quadratus lumborum resisting the spine bending sideways. A pattern that standard planks and dead bugs do not address, and whose weakness is implicated in lower back pain, IT band issues in runners, and hip instability. Also trains the glute medius (the side glute) critical for pelvic stability in single-leg movements.
Setup
Lie on your side with feet stacked. Bottom forearm on the floor, elbow directly below the shoulder. Top arm on the hip or extended upward. Body in a straight line from heels to head.
Movement
Lift the hips off the floor by pressing through the bottom forearm and foot. Hold the body in a straight line. Hip must not sag toward the floor (most common) or pike upward. Breathe normally throughout.
Key Form Cues
Squeeze the glutes to prevent the hip from dropping
The body forms a straight line in all planes: no rotation forward or backward
Stack the feet or stagger them if stacking is too unstable initially
Do not shrug the shoulder — the bottom shoulder should actively press into the floor
Common Mistake
Hip sagging — shifts the load to the lower back rather than the obliques. Drop to a knee-supported side plank until the full version is achievable.
Master Standard
3 holds × 30–45 seconds each side, level hips, straight body line
Progression
Hip dips (lower and raise the hip from the hold position) → Side plank with leg raise
Full Body / Cardio
The final exercise is the full-body movement that ties all patterns together under cardiovascular demand. Every serious bodyweight programme needs at least one exercise that elevates the heart rate meaningfully, builds work capacity, and trains the body to move efficiently under fatigue.
15
Burpee
Full Body / Cardio · Chest · Shoulders · Core · Quads · Glutes · Cardiovascular System
★★★☆☆
Why it's here
The burpee is the single exercise that tests and trains the most systems simultaneously. It combines a push-up (horizontal push), a plank hold (core stability), a squat (lower body), and a jump (explosive power and cardiovascular demand). It is uncomfortable, effective, and the clearest measure of functional fitness a beginner can track.
Setup
Stand feet hip-width. The full burpee has four phases: floor → push-up → stand → jump. Begin with the step-back modification (below) if you are new to it.
Movement
Full version: Squat down, place hands outside feet → jump feet back to high plank → one full push-up → jump feet to hands → stand and jump, arms overhead, land softly. Beginner mod: Replace jumps with steps; remove the jump at the top if needed.
Key Form Cues
Maintain push-up form in the plank phase — hips do not sag
Land softly from the jump: absorb impact by bending the knees
Keep a consistent pace rather than sprinting the first few — find a sustainable rhythm
Full push-up in the middle: chest to floor, arms fully extended at the top
Common Mistake
Sagging hips in the plank phase. Use the step-back version and work on push-up strength separately until the core can hold the full version.
Master Standard
3 sets × 8 full burpees with push-up, controlled landing, consistent form throughout
Progression
Increase rep count → Reduce rest between sets → Add a tuck jump at the top → Max reps in 30 seconds
📋
Exercise Reference Card
All 15 exercises in one filterable, printable reference — master standards, form cues, and progressions. Open on your phone and tap each exercise during your session.
Learning sequence — don't try to master all 15 in week one
Weeks 1–2
Wall push-up, bodyweight squat, glute bridge, hip hinge, plank — the single-star exercises. Master the body-line awareness, hinge pattern, and glute activation before adding complexity.
Weeks 3–4
Full push-up, reverse lunge, dead bug, towel row — adding the floor push-up pattern, first unilateral leg work, deep core stabilisation, and pulling for the first time.
Weeks 5–6
Pike push-up, Bulgarian split squat, single-leg glute bridge, side plank — the three-star exercises. More demand, more technical. Built on the foundation from the first four weeks.
Weeks 7–8
Inverted row, burpee (step-back version first) — the most technically demanding exercises in the set. The inverted row requires a table; the burpee requires all patterns to be solid before the full version is attempted.
The number of reps you can do means nothing if the form is wrong. Wrong form does not produce the intended training stimulus — it produces a different, usually less effective stimulus and a higher injury risk. Use the master standard for each exercise as your quality benchmark, not the rep count. An exercise that cannot be performed to the master standard has not been mastered. Keep working at it before progressing.
Sample 3-day week
Day
Exercises
Sets × Reps / Duration
Monday
Full push-up, towel row, bodyweight squat, glute bridge, plank
For every exercise: when you can complete all sets and reps with correct form and the last rep does not feel close to failure, apply one of these progressions in the next session:
📈
Add 1–2 reps per set
⏱️
Slow the lowering phase by 1–2 seconds (most underused progression)
⏬
Reduce rest time by 10–15 seconds between sets
🔼
Progress to the next variation listed under each exercise's progression field
⚠️ If an exercise hurts — not the discomfort of muscular effort, but joint pain, sharp pain, or pain that persists after the session — stop immediately. Pain is not part of the process. Have the movement assessed by a physiotherapist before continuing. Managing training gaps and comebacks is a separate skill from the exercises themselves.
The Bottom Line
These fifteen exercises are not a beginner compromise. They are a foundation. The athletes and coaches who produce consistently good results can trace almost every advanced movement back to the same fundamental patterns covered here.
A push-up done correctly is a precursor to a bench press and a handstand push-up. A hip hinge done correctly is a precursor to a deadlift, a kettlebell swing, and a Romanian deadlift. A dead bug done correctly is the core foundation for every lift where the spine must resist unwanted motion under load.
Master these fifteen — not just go through them, but actually master them, with the form cues internalised and the movement patterns automatic. That is the foundation everything else gets built on. And once you have it, building a structured programme that produces ongoing results becomes genuinely straightforward.
The gap between knowing an exercise and mastering it is real, meaningful, and worth the time. Every repetition done well is investment in movement quality that compounds over months and years. Every repetition done sloppily is reinforcement of a pattern that will eventually need to be unlearned.
Disclaimer: This article is for general informational and educational purposes only. It does not constitute medical or physiotherapy advice. If you experience pain during exercise, stop and consult a healthcare professional.
Frequently Asked Questions
What are the best bodyweight exercises for beginners?
The 15 foundational exercises cover all major movement patterns: push-ups and pike push-ups (push); inverted rows (pull); squats and lunges (squat); glute bridges (hinge); planks and mountain climbers (core); and burpees (full body). Mastering these 15 gives a beginner a complete fitness foundation before adding any complexity or equipment.
How long does it take a beginner to learn proper bodyweight form?
Most beginners can achieve safe, functional form in the major patterns within 2-4 weeks of consistent practice. Focus on one movement pattern per session rather than all 15 simultaneously. Form before reps: a clean set of 5 is worth more than a sloppy set of 20.
Can bodyweight exercises build real muscle?
Yes, provided progressive overload is applied. Bodyweight training builds muscle the same way weighted training does by progressively increasing the difficulty stimulus over time. Beginners often see significant strength and muscle development in the first 3-6 months of consistent training, particularly in the upper body, core, and legs.
How should a beginner structure a bodyweight workout week?
A 3-day-per-week full-body split works best for beginners: push pattern, pull pattern, squat pattern, hinge pattern, and core work in each session. Rest at least one day between sessions. This frequency allows adequate recovery while providing enough stimulus for adaptation.
What is the correct progression order for the 15 beginner exercises?
Start with the most accessible version of each pattern: wall push-ups or knee push-ups before full push-ups; chair-assisted squats before bodyweight squats; plank holds before dynamic core work. Progress only when you can perform 3 sets of 10-12 reps with controlled form.
FitnessBodyweight TrainingBeginnersCalisthenicsForm CuesBetter Living